The Straw House Blog

project_sample1

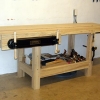
Making the Bench Top

Holy crap I’m tired.

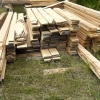
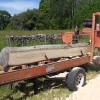
Dad and I started glueing up the bench top very early Thursday morning. The idea was that I could be there first thing in the morning, get one section glued up, then come home work all day, and head back up there right before dinner to glue up the next section. Then after dinner (thanks Mom!) we’d glue up a third section. With the top made up of fourteen pieces of wood we’d have make up four sections of three boards and one section of two boards. Those would then be jointed, planed and then glued to one another to form the bench top.

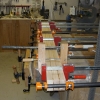
That worked very well on Thursday. So on Friday I arrived early and we got our first glue up done and clamped. Then we carried the glued up sections from Dad’s basement out to the back garage so that we could joint and plane them. Then we took them back to the basement again.

We figured that we would get the top to the point where we had an eight board section and a six board section, when we would transport those to my house for the final glue up. We didn’t think that we’d be strong enough to carry the completed table top out of Dad’s basement.

We almost weren’t strong enough to carry the two halves out of Dad’s basement.

And so, we made our first mistake. It was so much trouble getting the halves out of the basement we decided not to carry them to the back garage and plane them. “I’ll do them by hand” I said. “It’ll be fine!” Oh boy.

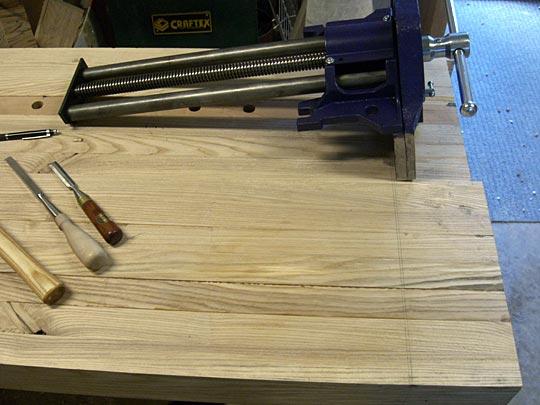
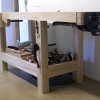
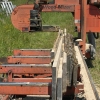
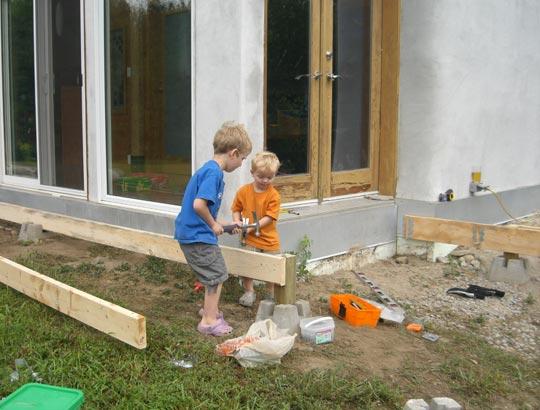
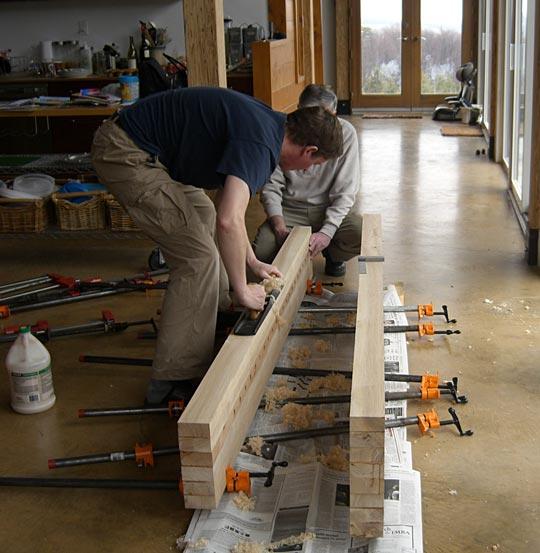
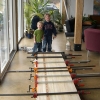
Once home we laid out the two halves on what I figured is the flattest section of floor in the house. Right at the front of the house. Joanne and I wrestled the two sections out of the truck and Gil and Declan carried all of the clamps from the back room to the front. By the way, I know that looks like a lot of clamps. It isn’t. There is no such thing as ‘enough clamps’.

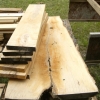
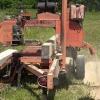
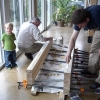
So once we had everything ready Dad and I trial fitted the two pieces and found, to our surprise that they didn’t meet properly. Oh well, out comes the jointer plane, and I start taking strips off the edges of the sections. Now bear in mind that I’m fairly new to hand tools. To this point I’ve ‘six-squared’ several small boards, but the bench is two feet wide and seven feet long. Most of my planing exeprience has been with a #5 Jack plane but compared to a #7 jointer plane it’s practically a toy. The #7 is a significant hunk of metal. Once you get that thing moving it actually creates its own gravitational field. I do not recommend using it hunched over like that, much stretching was required afterwards.

So with the edges squared up we applied the glue with Declan’s supervision.

Then we clamped it.

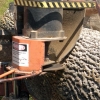
While the glue was drying Dad and I drove in to the city to go to Lee Valley for the bench vises. I’m using the Veritas Twin screw vise as the face vise, and a large quick release steel vise as the end vise.

But those cannot be installed until the bench top has been flattened. By not carrying the two bench sections out to plane them I have guaranteed that by the time this bench is flat I will no longer be inexperienced with a #7 jointer plane. I have also discovered a wide variety of muscles that are apparently only used when planing. I’m nearly done one side, but I’m done for today. I intend to pour myself a generous portion of Highland Park 18 year-old and emulate Declan.


project_sample1

Bench Update

There hasn’t been a huge amount of progress on the bench this week. Both side have been planed (relatively) flat. The top will get a final touch up once the bottom has been completed and attached. Unfortunately some of the boards have pretty nasty grain and I’ve had problems with tear-out. I may splurge and buy a smaller low-angle plane to do the final surfacing.

This weekend I cut then ends of the bench square and started installing the end vise. The end vise is let into the end of the bench. Cutting out the inset involved lots of small kerfs and then chopping out the waste with a mortise chisel. I only have one mortise chisel, it’s a 3/8” Lie-Nielsen with an Ironwood handle. Ironwood is the hardest wood that grows in North America (we have a lot of it on the land) and you can tell. After an several hours of bashing on the chisel with a maple faced hammer the hammer is dented and the chisel handle looks brand new.

Now that the inset is cut the vise can be mounted. Hopefully I’ll get to that some evening this week. Next weekend I’m hoping to get the twin-screw vise mounted. Once both vises are mounted I’ll flip the bench on the saw horses and start building the bottom. I’m planning to build the entire lower structure with hand tools, including sawing the tenons and wasting out the mortises. It’ll be hard work but I need the practice and most of these joints are hidden and don’t have to be pretty.

project_sample1

Logging

We had quite a few logs ready for milling back in the fall and had even booked the sawyer. Then the first week of November the snow started. It has been a great winter for snow, not so much for milling logs. Most of the winter the logs were completely buried. So spring is here the snow is gone and Dad and I spent a good portion of the last two days cutting down trees and pulling them out of the bush.

Yesterday we took out a good sized ash tree, including one of the biggest logs that we have ever pulled. Today we dropped a dead butternut tree that fortunately was still solid. It yielded three good logs and one so-so log.

So at this point we have thirty-eight logs ready to be milled, including yellow birch (1), elm (1), ash (23), maple (3), cedar (5), butternut (3) and chestnut (2).

We’re planning on dropping some beech, poplar, ironwood, hickory, ash, black cherry, basswood and cedar this spring. We only drop trees that are in decline or dead, we try and get them before rot sets in, but it’s tricky, some species rot from within (like poplar) so by the time they look ready to take they’re already hollow. Our best guess is that in addition to the logs we’ll mill this spring we’ll have another thirty to forty to mill in the fall.

The logs are rolled up onto scrap wood to keep them off the ground, but this is a temporary storage solution. Hopefully we haven’t lost any logs to rot over the winter. We’re planning long term storage for air drying the lumber. Even with access to a kiln the wood should be air dried for at least six months. Some of the wood (mostly the ash) we’ll air dry for a couple of years so that we can use it for steam bending.

project_sample1

Wind Generator Update

We dropped the tower a couple of weeks ago to see if it was alright before we ordered new blades.

Our main concern was that the bearings and bushings might have been damaged by the vibration of the unbalanced turbine. Once the tower was lowered we took as much of the assembly apart as was feasible, checked the moving parts for excess movement and everything seemed to be just fine. We put the tower back up - the safest place for the tower is up in the air, not down on the ground.

J.P. from Generation Solar ordered us new blades and I figure they’ll probably arrive right as the summer doldrums start. Right now it’s sunny and there’s a strong (though gusty) wind blowing outside. Normally at this time of year there’s an abundance of both sun and wind that we never have to run the genset. With the wind generator out of commission we’ve had to run the genset a few times over the last couple of months. I hate that.


Here’s J.P. and a good shot of where one of the blades broke off from the turbine. You can see that the blades snapped off just past where they attach to the turbine. We still have no idea why they broke. We did find the other blade though, it was about 200 metres downhill from the turbine, laying in the grass.


Green Home and Garden Tour

Peterborough Green-Up a local environmental group is holding a green home and garden tour on June 7, 2008, 10 a.m. to 4 p.m. We’re a part of the tour in addition to several interesting homes and businesses in Peterborough proper.

Details are available on the Green-up website.

Normally if you’d like a tour of our house you have to wait for the annual OSBBC Straw House Tour in October, so this is an early opportunity if October doesn’t work for you.

From the Green-up site: Take a tour of homes and businesses where real people are making real changes to reduce their impact on our local resources. These sites will showcase some of the inspirational environmental examples that residents in Peterborough are setting through personal actions.

Tour locations highlight examples of green lifestyles, including a totally off grid home, using recycled building materials, hot water heating, solar and wind energy, and more! Extensive natural gardens will also be on display at some tour stops, with examples of how to create great gardens while conserving water, providing habitat and food for wildlife, and enhancing the environment!


project_sample1

July Update

Spring and summer have been busy around the house. The bench is complete except for finishing. I haven’t decided yet what kind of finish I want to use on the bench yet, though I’m leaning towards Tried and True Linseed Oil and Beeswax finish as I love the depth and glow it gives to wood. Danish oil seems to be the traditional choice.

I had to disassemble the twin screw vise and re-install it, but that was expected. It’s very finicky to install correctly even when you follow the instructions to the letter. There’s still a bit of stiffness in the last inch of travel but I’ll probably leave it as is for a while and see if any other problems develop before taking it apart again. The rear vise jaws are secured to the bench with 5” bolts threaded right into the bench top. The front jaw, just like the end vise chop, is a piece of spalted Maple from a tree off our land.

We also had the portable saw mill in to mill the logs that I mentioned back in April. Of the thirty-eight logs only two proved to be rotten so we got away pretty lucky with storing them for so long.

Unfortunately some of what we had thought was Maple when we cut it in the winter turned out to be Basswood. On the other hand some of the Bassword was very nice. In particular we flitch cut the crotch of the tree and found some gorgeous grain and colour which is uncommon in Basswood which is normally very clear and white.

We’ll stack and sticker the wood through the summer and hopefully the Ash will be dry enough to go into the kiln this fall. My goal for this fall/winter is to get the ceiling done.

project_sample1

The new deck

Long time readers might recall a post I wrote back in April of 2005 talking about milling cedar and the fabulous decks that would be built. I’m pleased to report that construction has finally begun on the east decks, including a new deck directly off the front door.

This deck is a team effort, unfortunately I have to spend as much time trying to keep the kids on my team as I do building the deck. It takes only a matter of seconds for them to not only form their own team but for that team to splinter into two entirely separate (and warring) factions. Things degenerate rapidly at that point. So as a result both children are gradually accumulating their own tool sets and each has a simple task that they must perform in order to “help” me. For example both travel with a handful of 3 1/2” screws that each gets to hand me in turn as I screw down the decking. Both kids help me measure the deck (each with his personal dollar store tape measure natch) which lends an interesting twist to the old saw “measure twice, cut once” since neither can actually read a tape measure.

I have noticed that they are doubly helpful when they are wearing superhero pyjamas.

It’s all worth it when you get a section done and the kids are so proud that they helped build the deck.

project_sample1

Washout

We’ve had quite a bit of rain here in southern Ontario this year. In fact we’ve already had more rain than we had all of last summer and we’ve shattered all previous records. I don’t mind rain at all, but I’m not a fan of massive downpours that wash out my driveway. So far we’ve had three such storms this summer, and since we’ve never been washed out before that’s pretty serious rain.

We’ve had Eric in with the backhoe twice now to fix the driveway, and the township has been working on the road pretty much continually all summer.

We think there used to be a culvert here. If there was, it’s gone now.

If you look behind Declan you can see most of road, back there in the forest where it doesn’t belong.

Fortunately this new gully is the township’s problem, not mine.

Joanne makes me drive the truck over the washout, neither of our cars could make it.

Here’s the road. There’s a brand new ditch, the old ditch is full of the washout from the previous storms.


Green magazine

Our house is featured in the latest issue of Green, an Australian magazine. The article is very nice - written by our friend and former neighbour Liza Finlay and the pictures by her cousin Naomi Finlay are spectacular. This article is the first to feature photos of our house in the winter. Aside from being one of our four favorite seasons winter provides lots of sun to the interior of the house. The pictures look sun drenched and warm on the interior, an excellent contrast to the snowy landscape outside.

We had a a photoshoot here a couple of weeks ago for a forthcoming coffee table book and the contrasts between the two photographers and publications was remarkable. Naomi captured images of a house that people live in, including one fantastic shot of Gil and Declan that we’ll treasure forever (cliche though that may be). The coffee table book people don’t seem to want any people in the pictures at all. In fact another of their books that we looked through did not have a single living creature in any of the houses featured. In fact some of the houses didn’t even seem to have furniture. Le Corbusier, one of my least favorite architects described houses as “machines for living” and the houses in this book had been staged to the point where the interface between house and human was tenuous at best. So why did we agree to be in the book? It was a last minute request from our architects and I didn’t have a chance to check out any of the other books from this publisher beforehand.


project_sample1

New Panels

Last month we installed two more 175W solar panels to our array. For those keeping track we now have eight 85W BP solar panels, four 165W Sharp panels, and two 175W Sharp panels for a grand total of 1360W.

Unfortunately one of the realities of building an array piecemeal is that the sizes of the panels change from model-to-model and year-to-year. We really didn’t want to buy new racks so we decided to modify the existing racks that hold the BP Solar panels. We added two new mounting rails and moved the two existing rails to the sides. The new panels squeeze quite nicely in the middle.

This required that new holes be drilled to mate the horizontal rails to the rack uprights. If you look closely you can see a piece of wood we were using a blocker to prevent us from accidently drilling into the back of a panel. With Dad, J.P. and I it took most of the day to get the racks modified, panels mounted and wired.

Most of the time that we worked Declan played outside in the sand pile (side note: a pleasant side effect of straw bale construction is that you usually end up with enough leftover sand for a good play area.) He’s a remarkably self-sufficient kid.

We’ve been really lucky, so far this fall and we’ve had lots of sun. We call this time of year the “100 days of grey” because we typically go from late October to early January with little or no sun. In the last four weeks we’ve had many sunny days and have really seen the benefit of our new panels. Here’s a picture of the readout form our Outback MX-60 charge controller. You can see that the panels are bringing in 31.4A but the MX-60 is upping that to 38.3A. Typically we have to run the generator weekly through the 100 days of grey to keep the batteries charged but in the last four weeks we’ve only run it twice. In addition to saving money on gas, we really appreciate the peace and quiet.